CLOCK and POWER SPRINGSCLOCK SPRINGSClock springs are made from flat stock and coiled like a snail shell, each coil nesting inside the next larger one. They typically work inside a housing and exert torsional force against either a central shaft or the housing itself. Clock springs can be made from a variety of materials depending on what's needed. Smaller springs may be made from beryllium copper or similar alloys while larger springs are typically made from a high-carbon steel called 'blue clock' for its color. Making these springs is not difficult, but remember, safety first. Here's how you do it. First, figure out how much material you need. Unfortunately, I don't happen to know any handy-dandy formulas for designing clock springs, so if you know how many coils are involved, you can just multiply that by the the diameter (outside) and then by pi (3.1416...) to get a rough idea. Add a bit so you don't run short while coiling. Strip out material for a couple of samples. Note how long these are. Anneal one end of each piece and form whatever bends, holes, etc., will be needed to secure it to the central shaft. Make the bends as gradual as you can, to minimize residual stress. Then make two pieces of tooling. One is the arbor, and the other is a keeper ring. The arbor is simply a piece of round stock that has one end formed to accept the 'inside' end of the the stock as you've made it. Exactly what this looks like will depend on the final installation of your spring - all it needs to be is a way to hold it safely while you coil. The maximum diameter of the arbor is whatever will allow you to make the required number of coils and still wind up with a solid spring body that's smaller in diameter than its final destination. The keeper ring is also very simple, yet absolutely essential to make BEFORE you actually begin coiling. All the keeper ring is is 3/4 of a coil of round wire that will be able to hold your clock spring inside it and still have an inside diameter slightly smaller than the housing inside which the spring will eventually go. This is so that when you wind your spring, you'll be able to 'capture' it inside the keeper ring (with the 'outside end' of the spring protruding through the gap in the keeper ring) and then, to install the spring in its housing, simply put the spring half inside the housing and slide it out of the keeper ring safely.
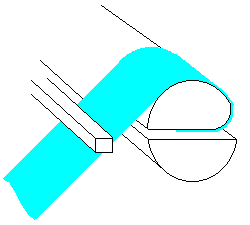
The coiling setup for making a clock spring is pretty simple too. Chuck up your arbor and put a piece of square stock in your tool holder, parallel with the arbor. You can define a channel through which your stock will pass by using a couple of C clamps. It's best to wind the spring with the stock traveling under the wire guide and over the arbor so you can see what's going on. There's no left hand and right hand to these springs, so how the stock actually feeds into the setup makes no difference.
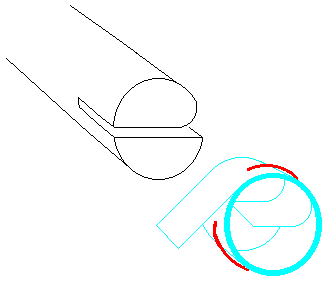
If you're working with heavy stock or if you're working with ANY stock and have to make a lot of coils, make one final modification to your arbor. Bolt a flat plate onto the end of it so that the stock cannot slip off the end while you're coiling and bring you grief. Okay. Let's give it a try. Take your first sample and secure the "inside" end to the arbor. Let the tail end of the stock run under the wire guide and make sure you have your keeper ring handy. Go ahead and coil up the stock (coiling speed DEAD SLOW) and stop when you have coiled the right number of coils plus ten percent OR when you get close to the end of your stock. When you're done coiling, slip the keeper ring over the spring (you may have to remove the safety plate first) and run the lathe backwards to release the tension. The spring will expand the keeper ring slightly: when it's loose on the arbor, go ahead and slide it off:
You can check it now - ideally in its final assembly - and figure out how much to change the length of the stock piece you start with. Once you've figured that out, go ahead and trim the second sample to that length. Then, form up the "outside" end of this second sample by bending, drilling, etc., so that it can be mounted in its final housing securely. Now go ahead and coil up this second sample and see if it works. Ideally it will. If not, you can always cut a fresh piece of stock and try again. Don't forget to make enough keeper rings! Forward to Finishing your springs. |


